Showing posts with label NWN2 Toolset. Show all posts

Friday, 26 June 2009

How to make your own NWN2 paintings – The Easy and Free way

This short tutorial was thrown together in 30 minutes and it probable contains lots of spelling errors, missed words and so on. But it should help the average module builder understand the principles of making a painting (or a rug, floor tile etc.) in a quick and easy way without expensive tools and knowledge about 3D-modelling and texturing.

[EDIT]
It's up at the NWVault. Go there for the latest version.

/A

Wednesday, 19 November 2008

Playing the pipe

No, not the painting with the same name but some rusty sewer-pipes. Tired of fiddling with the combat scripting I spent some hours making a few more pipe models for the module. It's a couple of bends, valves and a new texture. I don't know if those ever will be interesting for someone else as I'm pretty sure that iron pipes and valves are rare in Forgotten Realms. In the Great Underground Empire they are common though.


The guy in the background has nothing to do with the pipes. They are a part of my old self-balancing encounter generator. For the moment they are spanking an overpowering troll...

Thursday, 23 October 2008

Why do the torch lose it's VFX?

Cross-post from NWN2Forums:

While play-testing my module I've noticed that the standard hand-held torch lose it's flame and light effect. I've found four different situations.

1. It sometimes happen when performing an area transition.
2. It often (maybe always) happen when putting the torch in a container.
3. It always happen when using the CopyItem(object, object, int) function.
4. Sometimes it happens without a noticeable cause. I just run around in an area and when equipping the torch it has lost its vfx.

I've tried my own custom light sources and they behave in the same way so I suspect it has something to do with the handling of VFX's on items.

Now I've implemented a "fix lost vfx"-script in the game that the player can use but that's a really ugly solution.

So, is there any solution? Suggestions on a workaround? Any help greatly appreciated!

[EDIT]
There seems to be no solution to this common (as I have come to understand it) problem. So here's a workaround. Place this in your module's OnPlayerUnequipItemScript. It should take care of refreshing the torches and other hand-held light sources every time the PC un-equips them.

// * This code runs when the item is unequipped 
object
oItem = GetPCItemLastUnequipped();

if (GetBaseItemType(oItem) == BASE_ITEM_TORCH)
{
CreateItemOnObject(GetResRef(oItem), GetPCItemLastUnequippedBy(), 1, "", FALSE);
DestroyObject(oItem, 0.1, FALSE);
}
See you later friends!

/A

Wednesday, 15 October 2008

Back in business!

My back pain has lifted a bit. I don't care what the doctors say. Resting my back for a few days make my pain go away - workout does the opposite!

Okay, end of whining. It took me almost five evenings to find out what made my module behave like it did. Several scripts had been messed up and even if I recompiled them the result was the same. It seems that (I have no way to verify it) moving around my Halloween module scripts to and from the campaign folder made some of my Zork scripts believe that they were campaign scripts. Maybe due to the same name, I don't know. But converting all my scripts to campaign, compile them one by one and convert them back made it all work again. It's strange and I don't want to think about it anymore. I think I would have nightmares then.

Tonight I can get back to doing some real building - I hope.


/A

Tuesday, 19 August 2008

Please upload your Day and Night cycle settings!

Almost every builder seem to think that finding the best settings for the DayNight cycle is a pain and that everybody elses are better. So I suggested adding a new category - Day Night Cycle in the Prefab Areas to the helpful guys at Neverwinter Nights 2 Vault. And they bought it :) So start sharing all your settings. The more we have to chose from, the prettier modules to play.

Upload them here: http://nwvault.ign.com/fms/submit_processor.php?clusters=nwn2prefabareas and select category "Day Night Settings".

Have a nice day - I will.
/A

Monday, 18 August 2008

Fraser Fir Clusters; curse them all!

I have written about my forest areas performance problems by nighttime a couple of times. I've cut the forest into 7 smaller areas. I have removed all possible placeables and cut them out with the walkmesh cutter triggers. Then I've cursed, tried change the length of the night and cursed again. I've reduced the amount of threes to 40 per area. No luck! The games stutters at nighttime. I have even increased the memory in my computer to 3GB.

In a hysterical, wild and uncontrolled notion I did a batch replacement of all "FraserFirC" (they are nice an volumious) with a mix of "WestRedCedar (X1)" and "Scotch Pine - Cluster". To my surprice everything runs as smooth as anyone would ask for. The forest get a whole different mood to it but I'm not the one to complain. My wife says it look better. The sad thing is that it's 6 forest areas left to do it in. Lots of recoloring and adjusting textures for. But I'm a happy guy today! :)

Note: I should have suspected those fraser firs as I found out that the can be insanely performance craving when trying to help Wyrin with a strange crash in his DA2-module.

Thanks for reading, as always!
/A

Saturday, 16 August 2008

Dusk, Dawn, Arrgh!

One whole day in the trash bin! Now I've learned the hard way that the Module Properties setting "Dawn Hour" and "Dusk Hour" don't affect the DayNight cycle. A short background to get interested people into the function

Every AModule has a Time property where you can set:
  • Dusk Hour - the time when the transition from night to day begins
  • Dawn Hour - the time when the transition from day to night begins
  • Minutes per Game Hour - how many real time minutes one game hour takes
  • Start Day - the start day
  • Start Hour - the start time
  • Start Month - the start month
  • Start Year - the start year
Every Area has seven DayNight cycle settings where plenty of lighting a nenvironmental parameters can be adjusted.
  • Sunrise
  • Daytime
  • Sunset
  • Moonrise
  • Nighttime
  • Moonset
  • Transition
  • (Default - This one is not a part of the DayNight cycle and is used when an area has Day/Night cycle disabled.)
The problem I've been fighting is that I wanted the night to be shorter, as in the summer. So the natural way would be to set Dawn to 4 AM and dusk to 11PM. But no, after trying everything including suspecting my module to be corrupt I found:

The Dusk and Dawn settings only affect functions called from scripts, as GetIsDawn() and GetIsDusk(), some conversation tags, and the Area sound setting Ambient Sound Daytime and Ambient Sound Nighttime.

That's it, now I've to try changing the different DayNight cycles to fake a longer day by replacing the moonrise with sunset and night with moonrise and so on. I'm pretty tired of this and really need a better editor for the settings. Matbe I would write one. "NO, concentrate on the module!" *hitting myself with a mouse with low battery*


Here's a few of the new load screens. They are pretty dark, but when used in the game against a black background they look OK. The black top left corner will be used for some descriptive text in white.


The Cellar Area

The Coal Mine Area

Inside the White House Area

The Treasure Room Area


Wednesday, 13 August 2008

The joy of converting Placeables to Environmental Objects

I doesn't take much to make me happy :) Everyone knows that when an area is full of placeables the walkmesh can get messed up and that too many of them can make the area more performance intensive. Today I played around with my 14x15 Coal Mine area, converting every placeable that could be converted to a enviromental object. The area size on disk was reduced by 12%! It may not seem that much when a indoor area is about 4 MB, but it does really affect the overall size of a whole module.
[FILE] [BEFORE] [AFTER]
ARE 253kb 253kb
GIC 55kb 55kb
GIT 1,292kb 1,181kb <<
TRN 926kb 926kb
TRX 1,374kb 1,254kb <<
/A

Tuesday, 29 July 2008

Thou Shalt Backup Thy Module!

Thought I would share this simple bat-script with you fellow module builders. It's great to have it on the desktop so that I can backup my module directory fast and easy. The date format is Swedish but you can easily shuffle around the %yy%, %mm% and %dd% to fit your own needs. Just configure the SourceFolder and DestinationFolder and save. Even though you could use it on the entire modules folder I would recommend to use it with directory mode and you working folder.

@echo off
rem ** Backup script for NWN2 Directory Mod
e Modules **
rem ** The usual disclaimer applies - If you use it, it's your own fault **

rem ** Configuration **
set SourceFolder=C:\Documents and Settings\User\My Documents\Neverwinter Nights 2\modules\My Module
set DestinationFolder=C:\Documents and Settings\
User\My Documents\Neverwinter Nights 2\modules\Backup MyModule
My Module

rem ** **

for /f "tokens=2-4 delims=/ " %%g in ('date /t') do (
set mm=%%g
set dd=%%h
set yy=%%i
)

for /f "tokens=1-2 delims=: " %%j in ('time /t') do (
set hh=%%j
set mn=%%k

)
if exist "%DestinationFolder%\%yy%-%mm%-%dd%-%hh%%mn%" (
rd /S /Q "%DestinationFolder%\%yy%-%mm%-%dd%-%hh%%mn%"
)

xcopy "%SourceFolder%" "%DestinationFolder%\%yy%-%mm%-%dd%-%hh%%mn%" /s /i


Tuesday, 1 July 2008

Cutscenes

Just a small note...

Making a invisible creature with a boat VFX attached to it travel some distance along the Frigid River isn't difficult.

Making a cutscene that allows the PC to travel across areas, interacting with the boat via conversations where you can land the boat and disembark at different landing sites along the shore and being able to deflate/inflate and launch the boat at the same shores - That's difficult (for me that is).

Yesterday night I could travel the first portion of the river and chose between continue down the river or land at the eastern shore, deflate and pick up the rubber boat, go back inflate it and embark. The cameras are placed and now it's just 80% left to do on this RiverTravel-thing :) Tomorrow I'll look into some helpful stuff Wyrin and E.C.Patterson mentioned. Ahoy!!

Saturday, 28 June 2008

Maybe I'm stupid...

... but yesterday I realized the I can do conditional loops in conversations. I don't know why I missed it but it doesn't matter now. Okay, I did know how to make conditionals and conversation links, I'm not completely stupid :) What I needed it for is that damn boat travel that disturbs me by looking old school NWN1. I want the CutScene camera to track the boat down the river until the boat reaches a specific way point where the player can interact via the conversation that started the travel. The problem was that it's pretty difficult to calculate how long time it takes to travel between the way points so the conversation starts unpredictably and often very wrong.

This example convo shows an example loop (for everyone as stupid as me) that loops until the counter variable = 4. In my boat travel conversation this would be a variable set when reaching a specific waypoint or tripping a trigger. You can probable do it smarter (if so tell me, please).


Back to the toolset to start to implement it into the module. It won't be easy and I'm a bit nervous that messing with the existing scripts and conversations may give me real problems for a few days.

/A

[EDIT]
Yes, I'm stupid. This thing works but isn't the best way to do it. I'll ditch this baby immediately.

Thursday, 26 June 2008

Celebration day. 90 days without crashes!

When purging my backups i realized that yesterday it was 90 days since the last toolset crash. I know I may upset the Eight Gods of System Crashes by saying so and that I probably will regret it soon. During this period of peace I have done 1 542 saves without a toolset crash! That's about 462 Terrabytes written down to disk.

I believe this is why it has worked so fine for me:
  1. I'm using Directory Mode so the toolset don't have to pack/un-pack a huge .mod-file during every save.
  2. I'm not using HAK-packs during development. Every file resides in the override folder until the game is finished.
  3. When working with the toolset. I kill my Antivirus and deactivate my Internet connection. If I need Internet access I use Terminal Server Client to a computer with the connection.
  4. Only two programs are allowed to be started simultaneously. The NWN2Toolset and the NWN2Main, no mail, no paint, no notepad, nothing. I even stop some of the memory intensives WinXP services that usually run via a script.
  5. I have an egg cooking timer that beeps every two hours. Then I save and exit both the toolset and the client to get rid of memory leaks. If I see that WinXP don't get it back I sometimes restart the whole OS.
You may thing this routine is complicated. Well, I'm pretty used to it now and it's a LOT LESS WORK THAN REPAIRING and REBUILDING a crashed module.

Now I'm off to work and I'll buy myself some nice cake to celebrate this joyful event :)

Have a nice day everybody, and thanks for reading, as always.
/Amraphael

Thursday, 27 March 2008

MOD-mode and Directory mode

A couple of things I've picked up on this topic (yes I'm working in directory mode now).

Working with MOD-files and directory mode is similar to working with HAK-files and override directory. The mod is a just a combined file that contains a set of files of different types. If you save the module as a directory you see all the files. Areas, Terrain, Scripts, Dialogues, etc.

When working with large modules the crash rate during save and bake increases drasticly because you need to rewrite the whole MOD-file to disk. I have see the toolset rushing up to 780Mb when saving and then go back to 360Mb. If you work in directory mode it seems that only the files that are changed gets saved, which of course minimizes the risk of corruption.

If you are unlucky and still get a crash only the file that were saved at the moment is in danger and you can easily replace it from your backuped one.

When you are finished with your work and are about to distribute the module, save it as a MOD-file.

ONE IMPORTANT THING!
When going from MOD-file to Directory Mode and vice versa DO A BACKUP and remember to backup your directory now and then too.

Friday, 21 March 2008

Module don't load from Directory mode

I did a post on this on the NWN2Forums but thought I would increase my chances by asking here too.

My mod is about 300 Mb now and the crashes when saving to .mod are quite frequent so I've decided to work in directory mode.

The problem is that the game won't load, it just stops at "unpacking module".
If I re-save it as a .mod it works just fine. What am I doing wrong? Ideas, anyone?

[Edit]
I've noticed that it loads just fine when I launch it via the games "new game > new module" button, but it fails when I try to launch it from the toolset.

[Edit]
After little more digging I found some faint evidence about that it may be problems with launching mods from the toolset when using directory mode in this NWN2Forums thread:
"Toolset has become useless..."

I think I have to live with it, but if anyone should stumble upon a solution, please drop me a line.

Monday, 17 March 2008

Thanks for the help!

I got several good ideas both as comments on my post here and the one at NWN2Forums. Thanks everybody!

Here's a few example how I will change all my conversations:

Descriptions will be in italic:
You are standing in an open field west of a white house.
or
The rug is extremely heavy and cannot be carried.

Actions will be in green:
Kill the troll with the sword.
or
Give the jeweled scarab to the thief.
or
Walk away.

Navigation will be within brackets:
[more]
or
[next]
or
[previous]


[Edit]

The whole conversation formatting thing is based on some basic html starting and closing tags.

Examples:
<b>Makes the text bold</b>

<i>Makes it italic</i>

<color=green>Makes the text green</color>

Sunday, 9 March 2008

NWNP Episode 46: Developers Round Table

The February 10th Round Table Discussion I was invited to but due to weird technical problems I couldn't participate in is up at the Neverwinter Nights Podcast. I highly recommend listen to it if you're even so slightly interested in what's happing behind the scenes of some of the great community made modules in development.

Monday, 25 February 2008

Two days work lost!

Despite the size I decided to use the RWS Deep Chasm Tileset to make the maze more dynamic. It's a very nice collection of tiles in three different levels. The texturing leaves a bit to wish for but the overall feeling is just perfect for this part of the game. At Saturday morning I put it in and worked all day with the maze. Sunday I spent on securing all transitions and random doors then I started to script the parts that is associated with the maze. I even wrote a short conversation (I felt great - because there are so very few of them in the game).

At the evening after we'd watched Miyazaki's My Neighbour Totoro (I really loved it), I did my usual backup and tried to play a bit. Argh, the area doesn't load! I restored my backups all way back to Saturday morning without luck. It seems that the area got corrupted that first save and that I had made backups of a non functional module all the time. It don't even loads in the toolset anymore. Well. well, this was the first time I've encountered such bug so I don't hang my head. I'll have a go on it again at Thursday.

The upcomming weekend will be dedicated to my wife. We will take in on al uxious manor house at Friday - Saturday, just relaxing, eating and drinking. At Sunday we visit an afteroon teaparty were you can eat so much candy, cake and cookies you wish, everything are homemade and of the very best quality. Next week I'm back on diet :)

Wednesday, 20 February 2008

129 Megabytes of joy!

Pooh, today I finished (everything grass and triggers) the last above ground area. The big forest I had before has been splitted into seven separate areas. I've made the house area and at last the canyon area. It makes nine areas instead of two :)

I'll give you mod builders a tip: When working with terrain and texturing in a large module - start a new one. It's faster to load when testing it out, it saves faster and it doesn't crash as often. I have only encountered 12 crashes when working with the areas above. It's less than one crash per day!!! When you are satisfied enough with your work. Export it to an erf. And import it to your module. And that's what I'm about to do now. I'll post you some screen shots tomorrow.

/A

Thursday, 14 February 2008

Arrgh, that #@¤& forest!

As I wrote before I had to go back to one big area because splitting the forest in to seven parts made it surprisingly huge in MB. Now I've spent about 5 hours splitting that bigger area into pieces again. The performance was fine through whole of my test phase, but when running around in it a bit longer and the evening came, with its long shadows and mysterious ligth it suddenly became very slow.

Okay, it looks nicer, it loads fast and it is easier to navigate but I'm starting to get really tired of this forest. Now I have to optimize all seven parts and redo all transition triggers and place all the sounds again.

One screen shot:

Wednesday, 13 February 2008

Short Exterior Area Texturing Tutorial

For this short tutorial we use 5 different textures that works fine togheter. It'll end up as an open woodland type of landscape. (Afterwards you can play with the Swapper Tool to replace textures for different looks. Use CTRL+Z CTRL+Y to compare between the two textures.) In this tutorial I use black spots in different shades to show where to paint and how hard. Pitch black is 80%, light grey is about 15%.

Lets start with using the Fill Tool to fill the entire area with GRASS15. Then shape your terrain into the the small hills and hollows that are needed. Use the Raise and Lower Tools. 3x3 and 6x6, 15% with a few clicks and short strokes will usally look good. For longer and bigger parts use your Flatten Tool 15%. Watch out for too crazy hight differences! Place a human creature in your landscape and a reference and ask yourself if it looks okay.

Now place your trees. Not to many, be carefull with using more than a couple types and be stint with how many seeds you use.

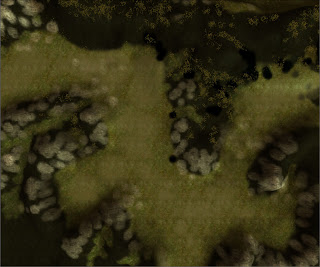
Next, paint the areas under the trees with GRASS11. 80% under the stems for a fallen leaf/needle look. Use 50% to smoth it out around the darker spots. In this image the GRASS11 is replaced with Black shades.

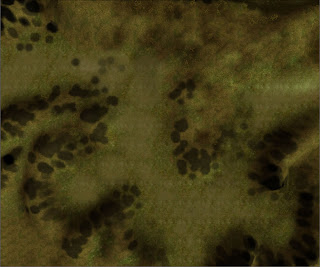
Now we go for the rocks. Hide the trees and use CLIFF04 to lift up the rock face from the grassy grounds here and there. It's best used on the slopes and where you have sharp edges. You can also use it on the ground where rain and wind would have abrade the rock. Use 2x3 50% for clearly visible rock and 1x2 25% for a blended look. You see that the grass shines through a bit in the Black spots this image.

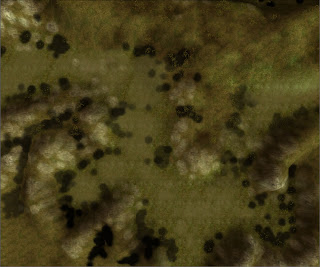
The rocks now looks lik stains on the ground so we'll make some grass stone combination, GRASS01 1x2 25% and 15% grow over the edges. Use this mainly on the lower parts of your rock textures as in this image.

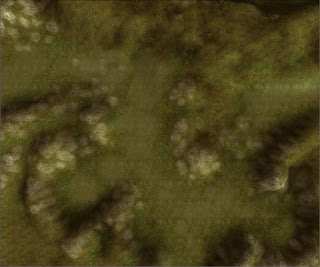
Now we're on to the last part which is a path or lower ground texture. It's a mix of small pebbles and grass, GRASS04, which we use in the bottom of the hollows. Use it carefully with larger dot's of 50%, some smaller of 80% and a little random strokes of small 25%. Like this:

Now take a look at your area with trees visible. The "path" is probably to sharp in the edges and need to be jagged by some GRASS15 80%. There's problably also too little of the leafy GRASS11 under your trees. It starts to look good, isn't it?

Okay, on to the final and most important touch, the color shading. Select the Color Tool. Use a 2x2 30% brush with a grey color. I use the first one from the left in the second row. Now click a couple of times under the trees to give a stronger impression of the absence of light. Enhance the rock slopes and ground pans with darker strokes. Look for repeating textures and break them upp with a few clicks and strokes. It takes some practise so use CTRL-Z and CTRL-Y often to compare and undo. Then shift color to the brown one, the first on the left at the last row. Make the ground around the trees more brownish. Go over the grass here and there and use the color to darken spots where the grass grows thicker or around rocks to make them look a bit dirty and earthy.

Now you should have something like this:

Now you can place your grass. Don't make it too thick 20-25% density will do. Compare the grass height with your reference creature. Where I live there's no grass grows 1.5 meters high in the woods :) If you look carefully in the black areas in this image you see the grass shining trough. Overdoing it will make your area heavy and slow. Then the players will turn down the visual goodies and they won't see your grass at all.


Place your placeables. The stonepiles, the fallen trees. And of course the animals, sounds, encounters etc.

Good luck!
Amraphael

[EDIT]
Wow, I spell like I'm like five years old :)
Tomorrow I have a spell checked PDF up at the NWVault.